This is the system I've been using for Battles and Skirmishes for a few adventure-years now, and I think by this point I've worked out enough of the kinks that I feel comfortable enough sharing it. Credit where credit is due, a number of the ideas involved here are inspired by similar mechanics found in the Book of Battle vol. 2, which we had been using before this but had found unwieldly and unintuitive to our tastes. This isn't a reinvention of the wheel, rather a reworking. I went into this with a few design goals in mind:
How well the player-knights do in combat in some way impacts the tide of the battle, but at such a level that is appropriate for the scale of the engagement they are in. One valiant knight critting every round would be decisive in a skirmish, but next to negligible at a huge battle like Badon or Camlann.
The players and the GM have a general understanding of how the battle is going, at which points along the battle line, with more detail closer to the players and less detail the further away you get.
Much like the Book of Battle, have a high level of abstraction that lets the players understand their objectives in terms of a minigame without either they or the GM needing to be an expert on medieval battle tactics.
I will start by explaining the Skirmish system first, because the Battle system is more or less just a framework for stringing along a series of skirmishes.
Skirmish Rules
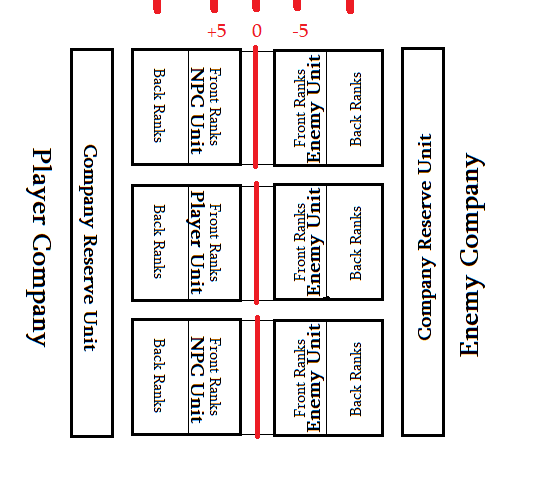
Skirmish here is defined as an extended combat between two units. A knightly unit, or Eschille, is conventionally between 15 fighting men (5 knights and 10 footsoldiers) and 60 fighting men (20 knights and 40 footsoldiers), with an average of about 30. Saxon units, entirely afoot and in tight formation, tend to be twice as large. The diagram below shows the starting position of two units, the players on the left and the enemies on the right.
The red line running down the middle represents the tide of combat. It begins in the middle, but will move either right, or left, or stay where it is, to reflect the balance of power. If it moves right, so that it crosses the box marked "Front Ranks" on the enemy unit, that means that the players have penetrated the enemy's front line and are now fighting in amongst the inner ranks, and the enemy unit is in danger of breaking. If it moves another step rightwards and crosses the "Back Ranks" box, that means that the enemy formation has been shattered and put to rout. Likewise, a step leftwards means that the Players have been pushed backwards into their own ranks, and two steps leftward means that their unit has been destroyed. When the Line is in the middle unmarked box, that means that the two sides are evenly matched and both fighting in good order. In short Line goes Left = Losing, Line goes Right = Winning. A skirmish may be over in a single round, or the balance of power may seesaw between the two sides for a number of rounds. The skirmish ends either when one of the commanders orders his men to retreat (who must spend 1 round then doing so), or one side has been put to rout.
The Line moving rightward 1 space is called a "1 Tick", which is why I call this system "Tick the Boxes".
The Procedure is as follows:
Step 0: Context
What is happening? Who is fighting who, and under what circumstances? Is either side outnumbered, outflanked, or surprised? If so, assign the appropriate modifiers to be assigned to the Unit Commander's Battle roll in the following step. Examples of appropriate modifiers:
Unit is outnumbered 2:1, -5 Battle
Unit is outnumbered 4:1, -10 Battle
Unit is outnumbered 6:1, -15 Battle
Unit is surprised, outflanked, or fatigued, -5 Battle.
Step 1: Maneuver Roll
"To me! On the Left! Charge! Hold the Line! Retreat!"
The Unit Commander rolls at the top of each round to see how effectively they have coordinated their men. This covers any number of potential granular factors, such as whether the unit is in an appropriate formation, has attacked the right part of the enemy line at the right time, or has made best use of their environment, all things which are no doubt important to the success of a military action, but which would be a headache to work out in detail.
Simply have the Unit Commander roll Battle unopposed, modified if at all by the factors determined in step 0.
Crit: Maneuvered Brilliantly
Success: Maneuvered Well
Failure: Maneuvered Poorly
Fumble: Maneuvered Abysmally
This result does not have any direct impact on combat, but combined with the result of the combat, will determine how well the Unit does overall each round.
Step 2: Combat
Substep A, Combat Stance
Each player decides how aggressively they want to fight.
Bold: The Player is charging out boldly ahead of their comrades. Player fights 2 enemies this round and checkmarks Valorous. Do this if you have a very high skill, perhaps as the result of a Passion, and would like to maximize glory and the chance of victory.
Orderly: The Player is shoulder to shoulder with their fellow knights, taking an equal share of the danger. Player fights 1 enemy. Do this by default.
Hesitant: The player holds back behind their friends, trying to avoid danger. Player fights 1 enemy with the help of another (enemy at reduced skill) and checkmarks Cowardly. Do this if you are close to death and you don't care how the rest of the unit fares.
Substep B, Resolve Combat
Each player rolls their Weapon Skill against that of an enemy combatant, or combatants, as the case may be. The player should be facing a different enemy every round, ideally rolled for on some kind of Random Enemy Table appropriate for the encounter. The player does not need to roll damage against the enemy combatant on a success, only the result matters. If the player loses, the enemy does roll damage against them however.
The result gives the following Combat Score, per player, per enemy if fighting several. If fighting Hesitantly, give the Combat Score appropriate for 1 result lower.
Crit: +2, "Fought Valiantly".
Win: +1, "Fought Well".
Tie: +0, "Held Their Own".
Loss: -1, "Was Hard Pressed".
Vanquished: -2, "Was Struck Down".
Example 1: Sir Ambrut fights Boldly (against 2 opponents), winning against 1 opponent and critting against the other, his combined Combat Score for that round is +3
Example 2: Sir Laingrin ties against his opponent, but because he fought Hesitantly (opponent at half skill), his Combat Score for that round is -1.
Substep B Alternate: Resolve Duel
Sometimes it might be appropriate for a player to duel an important enemy NPC, such as a commander or a monster. This can either happen by GM Fiat, or happen as the result of a random enemy roll. When this happens, the Player and their Opponent enter an extended melee, and fight for as many rounds as necessary, the rest of the engagement paused around them. Both roll for damage as necessary. Either combatant may withdraw from the Duel at any time, but doing so counts as a Loss. Results:
Vanquished Opponent: +2 Combat Score
Opponent Withdrew: +1 Combat Score
Withdrew: -1 Combat Score
Vanquished by Opponent: -2 Combat Score.
Substep C : Determine Combat Result
Average the Combat Scores of all the Player-Knights participating.
Average > 1 : Unit Combat Triumph
Average > 0: Unit Combat Victory
Average = 0 : Unit Combat Tie
Average < 0: Unit Combat Loss
Average < -1: Unit Combat Disaster
Example: With Ambrut achieving a +3 Combat Score and Laingrin a -1, the average of the two = 1. They therefore achieved an overall Unit Combat Victory.
Step 3: Determine Unit Result
Compare the result of the Maneuver Roll in step 1 with the Combat Result in step 2 on the table below.
Remember that "+1 Tick" = the Balance Line moves 1 box rightwards, ie the Players get a step closer to winning. You need a net total of +2 Ticks against the enemy to rout their unit. Regardless of the current balance, a result of +/- 3 Ticks in one round will always rout the respective unit.
For example, Ambrut and Laingrin's Unit Commander rolled a Success on their Maneuver roll. Combined with their Combat Result of "Unit Victory", that means that their Unit Result is +1 Tick.
Their unit is now at a net of +1 Ticks against the enemy.
Ambrut and Laingrin's unit have the enemy on the ropes, but they have not won yet.
Restart the Process at Step 1, but with the following change: The Unit Commander receives a -5 modifier to their Maneuver Roll, as indicated on the diagram. This is because their men are in amongst the enemy ranks now, and it is therefore harder to maneuver effectively. This is essentially a catch-up mechanic for the side that is losing.
The process is repeated for as many rounds as necessary until either one side is shattered, or spends 1 round retreating without being shattered. Sometimes the Skirmish is over after 1 round, usually it's 2 rounds, but I've seen them go as long as 4 or 5 rounds on occasion.
Battle System
Here a Battle is defined as an extended conflict between groups of multiple opposing units.
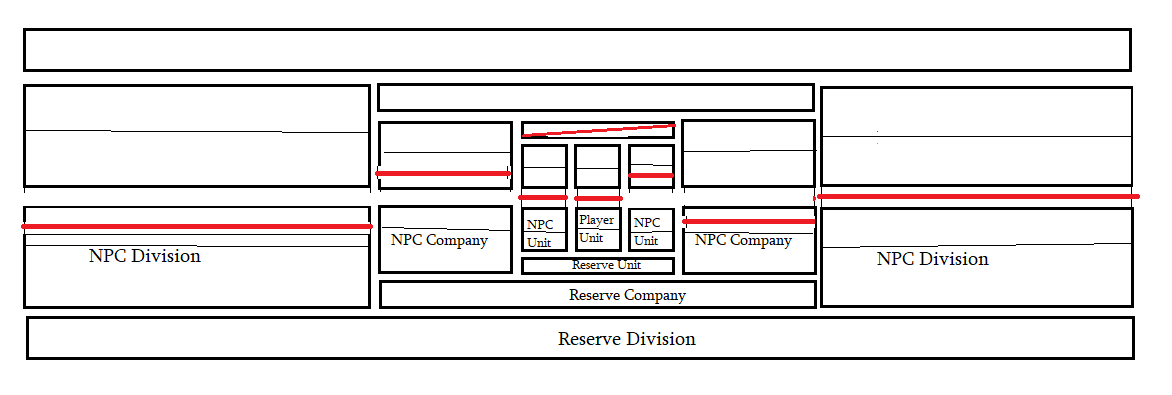
The main conceit of this system is that it imagines every army as being comprised of 4 parts: a Left, a Right, a Center, and a Reserve. Each of those four parts is then itself divided into four parts, and then those in turn are divided into four, all the way down to the Company level, which is comprised of 4 Units.
1 Army = 4 Battalions
1 Battalion = 4 Divisions
1 Division = 4 Companies
1 Company = 4 Units.
This is a fairly abstract construction that is intended to create a simple, scalable, battle mini-game, not to accurately reflect how the respective armies are actually organized. Dividing everything into Left, Right, and Center is fairly intuitive and one would imagine it actually looking that way on the battlefield, but the 'Reserve' portion of each formation down the chain is the most abstract; the Reserve may, in the actual organization of the army, be an actual distinct unit with a designated commander, or it may simply represent deeper and deeper ranks of the army.
The purpose of the Reserve, in this system is to reflect the following: that a Battle is generally not just every Unit from each Army fighting each other side by side all at the same time; Armies get deeper as they get bigger.
Observe, a Company vs Company diagram:
The general idea is that when you destroy a unit, their respective 'reserve unit' moves up to replace it. When that happens, you move the Balance Bar back to center, and cross out the Reserve box, to show that the company no longer has men in reserve.
If you then proceed to destroy the unit opposite you a second time, without your side having lost any units, you destroy the enemy company.
This then scales up further. When you destroy an enemy company, a reserve company moves in to replace it. If you then destroy the enemy company again, you destroy the enemy Division, etc. Here is a Battalion vs Battalion diagram:
Even though Battles can and will get larger than the Battalion vs Battalion scale, trust me, the above is all you're ever really going to need. Battles bigger than that should almost always have scripted outcomes. At the Army vs Army scale, things get hard to read down at the unit level. Here for example is the Army vs Army Diagram from the start of the Battle of Lindsey, which we ran recently:
That's King Uther in the center battalion, Duke Ulfius on the (flipped) right battalion, Duke Gorlois on the (flipped) left, and Duke Corneus in reserve. You can just make out the arms of the player-knights, three of them commanding their own units.
You will notice, regardless of the size, that the unifying principle here is that the diagram is detailed close to where the players are, and vague the further away it gets.
The procedure for running a Battle is essentially the same as running a series of skirmishes, except inserted into the procedure is an additional step every round:
Step 4: Determine Fate of Neighboring Units
You do this with a simple 1d6 roll for each unit, as follows:
7: +2 Ticks
5-6: +1 Tick
3-4: +0 Ticks
1-2: -1 Tick
0: -2 Ticks
As the situation may dictate, assign a modifier of +1 or -1 to this roll in circumstances in which the player-unit may get a +5 or -5 to its Maneuver Roll, for example when one side outnumbers the other. This includes the typical -5 penalty for being among the enemies ranks, at net 1 Tick.
You roll for the other Units in the player's Company at the end of every round.
You roll for the other Companies in the players' Division at the end of every 2nd round.
You roll for the other Divisions in the players' Battalion at the end of every 3rd round.
The Fate of Other Battalions really ought to be scripted, but if you really want to you can roll for them every 4th round.
This way, at the end of 3 rounds, the Battalion v Battalion diagram may look something like this:
I hope you get the general idea.
When a unit, company, division etc. is broken, the corresponding reserve will usually take 1 battle round to move up and replace it. During that time, the victors may:
a) Keep moving forward and attack the incoming reserve immediately.
b) Prepare for a lance charge next round.
c) Take advantage of the gap and flank a neighboring unit. This is a high-risk, high-reward maneuver. For 1 round, you get a +10 to your maneuver roll, but if you fail to break the enemy unit in that time, next round the incoming reserve will counter-flank you, and you will instead suffer a -10 to maneuver.
d) Await the incoming reserve, during which time individual knights can take turns returning to camp to receive first aid or stowing away a captured prisoner.
Conversely, when the player's unit is destroyed, they then have the following options:
a) Go and join the incoming reserve.
b) Go back to camp
c) Strike out on your own as a unit of 1, like a lunatic. For the next round, fight three enemies at once. If you achieve a Combat score of at least +3, your routed unit will rally back to you in the next round at half strength (-5 maneuver with that unit for the rest of the battle), and you receive a bonus 100 glory. If that doesn't happen but you still manage to survive, you will be fighting among the incoming reserve next round.
d) Allowed only for Player-Characters and occasionally Important Named NPC's: Rally your comrades to you with an Orate roll. On a Critical Success, half your own unit rallies to you and your losses are made up by scattered soldiers from other broken units. On a normal success, you rally your unit back to you at half strength, -5 to maneuver for that unit for the rest of the battle. On a failure or fumble, nothing happens. Successfully rallying a broken unit in this way grants a bonus of 50 glory.
Glory
Glory for participating in Skirmishes and Battles are awarded in 4 ways:
1) Combat Glory
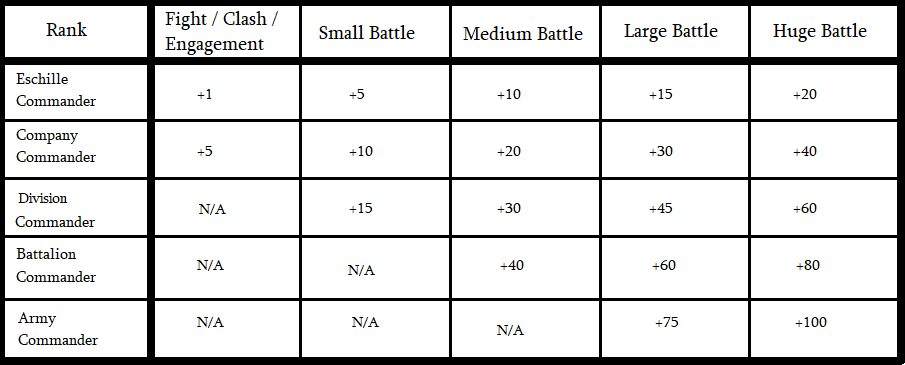
Glory is awarded every round, per enemy, according to your combat result and the size of the battle. The Battle Size Categories are as follows:
Fight/Clash: Unit vs Unit. Average 60 total combatants.
Engagement: Company vs Company. Average 240 total combatants.
Small Battle: Division vs Division. Average 1000 total combatants.
Medium Battle: Battalion vs Battalion. Average 4000 total combatants.
Large Battle: Army vs Army. Average 16000 total combatants.
Huge Battle: Grand Army (4 Armies) vs Grand Army. Average 64000 total combatants.
Glory does not vary depending on enemy type in standard combat, only in the event of a duel, as described below.
2) Duel Bonus Glory
It is generally appropriate to award bonus glory for winning a duel in the middle of the battle, should one occur, at GM discretion.
I generally have two kinds of potential duel targets per engagement, an Officer type, and a Champion type. Defeating an Officer gives you +50 bonus glory for the round in addition to combat glory, while a Champion type might get you +100 glory. In a Saxon army I generally have a veteran Thegn as the officer type duel, and a Small Giant as the Champion type duel.
For example, if Sir Ambrut, while fighting in a medium battle, encounters an Officer and vanquishes him in a duel, he gets +60 combat glory and +50 duel bonus glory for 110 total that round.
3) Commander Bonus Glory
Commanding other knights in battle is an honor, and ought to yield a modest bonus to glory per round.
The bonus glory per round for being a commander is not directly affected by how well your unit does, except in the following ways:
a) If your unit is destroyed, you stop getting glory for being a Commander for the rest of the battle.
b) You are first in line to receive Banner glory, described below, when your unit destroys that of the enemy.
4) Banner Glory
"Banners" in this system are yet another abstraction; in literal terms they represent enemy battle standards or other such trophies retrieved from the battle field, in mechanical terms, a "Banner" is a transferable token awarded to a commander for destroying an enemy unit, worth a certain amount of glory.
Unit Banner: 50 Glory
Company Banner: 100 Glory
Division Banner: 250 Glory
Battalion Banner: 500 Glory
Army Banner: 750 Glory
Grand Army Banner (Such as the Dragon's-Head standard of the Pendragons): 1000 glory.
By custom, the banner belongs first to the commander of the victorious unit. The commander may then choose to award it either to a worthy subordinate, or their own superior. Granting a banner to one's subordinate grants a Generous checkmark, and if applicable, a Loyalty (Vassals) checkmark. Granting a banner to one's superior grants a Modest checkmark, and if applicable, a Loyalty (Lord) checkmark. The commander is under no obligation to give the banner away to anyone and may keep it for themselves if they so choose.
Unlike all the other sources of glory, Banner glory is flat and is not multiplied according to the overall result of the Battle.
Battle Result Multipliers
Decisive Victory: x2
Indecisive: x1
Decisive Defeat: x0.5
Total Glory Formula
[(Combat Glory + Duel Bonus Glory + Commander Bonus Glory) x Battle Result Multiplier] + Banner Glory.